Showing posts with label Cuttlebug. Show all posts

Wednesday, October 30, 2013

It's Blog Hop Time!

Welcome, Hoppers! If you have just left Tiare's blog at iClassyGirl.com, then you are at the right place. If not, then hop on over to Club Scrap Creates to start at the beginning of this month's hop, so you don't miss any of the fun and creativity!

The featured kit this month is Lock & Key, and I challenged myself to come up with a Christmas card for this kit. The name doesn't really cry out "Christmas," does it? I knew I really had to put my thinking cap on! (To see the Christmas card I made with last month's Take Wing kit, go here.)


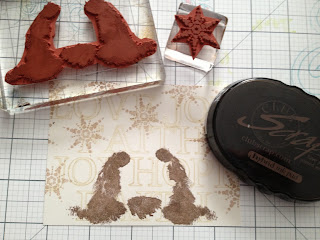
So, I was looking at the UM rubber, and the large words caught my eye. As a Christian, I believe that Jesus is the embodiment of these words: Hope, Faith, Love, and Joy. I realized that I had my connection between Lock & Key and Christmas!
 
I paired the words with the holy family and a snowflake from the Silent Night (December 2010) unmounted stamp sheet. Such unique artwork, don't you think?

Here's one of my final cards. Below you find the basic steps I used to create this unique card and four others.

However, if you are ready to hop on, your next stop is Marya's blog at A Notebook Novel.
I chose to work with five cards in the Lock & Key Greetings to Go pack. It's so handy to have cards that are precut and scored, with panels that fit so well! The pack even includes envelopes; I told you it was handy! Each month the Greetings to Go pack has 15 card/panel/envelope combinations (in three sizes) with cutaparts and fibers. One of my favorite Club Scrap products! (It's hard to tell, but those tan-colored panels are actually metallic--too cool!)
 
To start the cards, I stamped each of the ivory panels with the words using Club Scrap's Sandstone ink. An acrylic block with lines on it comes in real handy for keeping words straight.
On the words, I used CS Earth ink to stamp the holy family, then added snowflakes at half strength. Some folks call that "second generation" stamping. You just ink up the stamp, then stamp once onto scrap paper and then onto your project. You get half the amount of ink. I like the way Joseph, Mary, and the manger really stand out darker than the other elements. I stamped five similar ivory panels.  


When using metallic paper, I love to emboss it--there's something about the way the light hits the raised areas on metallics. Anyway, I used a Fiskars embossing plate for four of the panels and a Cuttlebug folder for the fifth. Since this Cuttlebug folder doesn't have an all-over design, I wasn't sure how I was going to use it, but I came up with a way. Below are the embossed panels. The fourth one is the Cuttlebug one.


And here, again, is my favorite of the five cards. I just layered the stamped and embossed panels on the card base and added some torn handmade paper and brads (the paper was from a 2003 (?) CS kit called Evergreen. I like the addition of the green for Christmas, but a deep red or burgundy would look nice.


Below are the other four cards. You can see the way I used the Cuttlebug embossed metallic on the top card--just cut along the image with a craft knife to create a frame.
I hope you enjoyed a little early Christmas cheer using Lock & Key in an unexpected way. Next month's kit is Fire & Ice. Oh, dear!!

Thanks for making it to the end of my post. Your next stop on the hop is Marya over at A Notebook Novel. I'm looking forward to her Lock & Key creation!

Sunday, March 2, 2008

Challenge for Pages of Pictures


Erin, the blogger of Pages of Pictures, has a tutorial challenge going on. She has challenged her readers to pull out an unused/ unloved tool and create something with it. I chose my Wizard Embosser by Spellbinders, as it is one that I have recently fallen back in love with. Since buying it a few years ago at a Stamping Expo, I've used a number of things to run through the machine with Club Scrap cardstock, but I'd gotten tired of those things and hadn't used it in a long time. Then, when doing a Little Fat Book swap this winter with the Club Scrap Chat forum, I received a lot of 4x4 cards using a unique embossing template, which I later learned was called Cuttlebug (this is by Provocraft). Now, I'm not going to go out and buy another embossing machine since I already have the Wizard, so I did some research and found out that I can use the Cuttlebug embossing folders with my Wizard! I ordered a few of the folders, and when they arrived the other day, I pulled out the Wizard, dusted it off, grabbed some luscious Club Scrap cardstock, and embossed away! I was so impressed with the result! I've made two projects with my old tool (the Wizard) and my new toys (the Cuttlebug embossing folders).

The first project is a little booklet to keep my Wizard Recipes handy. This info is from the Spellbinders website, and it gives lots of ideas on how to use the Wizard to cut and emboss items, and how to stack the plates, cardstock, and embossable items to run the "sandwich" through the machine.

My second project is for the spring Little Fat Book swap at the Club Scrap Chat forum. I ran the blue base paper through the machine with another floral Cuttlebug embossing folder. The pic shows the decorated side and then the back of another 4x4 page. I like the way the embossing dressed up the foundation page.

So, now I've gotten my old tool back out and I'm glad I did. Now I have to order more Cuttlebug embossing folders to play with! It's much better than the Wizard sitting around gathering dust.