Wednesday, October 30, 2013

It's Blog Hop Time!

Welcome, Hoppers! If you have just left Tiare's blog at iClassyGirl.com, then you are at the right place. If not, then hop on over to Club Scrap Creates to start at the beginning of this month's hop, so you don't miss any of the fun and creativity!

The featured kit this month is Lock & Key, and I challenged myself to come up with a Christmas card for this kit. The name doesn't really cry out "Christmas," does it? I knew I really had to put my thinking cap on! (To see the Christmas card I made with last month's Take Wing kit, go here.)


So, I was looking at the UM rubber, and the large words caught my eye. As a Christian, I believe that Jesus is the embodiment of these words: Hope, Faith, Love, and Joy. I realized that I had my connection between Lock & Key and Christmas!
 
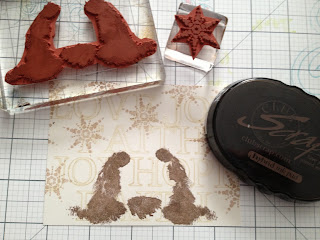
I paired the words with the holy family and a snowflake from the Silent Night (December 2010) unmounted stamp sheet. Such unique artwork, don't you think?

Here's one of my final cards. Below you find the basic steps I used to create this unique card and four others.

However, if you are ready to hop on, your next stop is Marya's blog at A Notebook Novel.
I chose to work with five cards in the Lock & Key Greetings to Go pack. It's so handy to have cards that are precut and scored, with panels that fit so well! The pack even includes envelopes; I told you it was handy! Each month the Greetings to Go pack has 15 card/panel/envelope combinations (in three sizes) with cutaparts and fibers. One of my favorite Club Scrap products! (It's hard to tell, but those tan-colored panels are actually metallic--too cool!)
 
To start the cards, I stamped each of the ivory panels with the words using Club Scrap's Sandstone ink. An acrylic block with lines on it comes in real handy for keeping words straight.
On the words, I used CS Earth ink to stamp the holy family, then added snowflakes at half strength. Some folks call that "second generation" stamping. You just ink up the stamp, then stamp once onto scrap paper and then onto your project. You get half the amount of ink. I like the way Joseph, Mary, and the manger really stand out darker than the other elements. I stamped five similar ivory panels.  


When using metallic paper, I love to emboss it--there's something about the way the light hits the raised areas on metallics. Anyway, I used a Fiskars embossing plate for four of the panels and a Cuttlebug folder for the fifth. Since this Cuttlebug folder doesn't have an all-over design, I wasn't sure how I was going to use it, but I came up with a way. Below are the embossed panels. The fourth one is the Cuttlebug one.


And here, again, is my favorite of the five cards. I just layered the stamped and embossed panels on the card base and added some torn handmade paper and brads (the paper was from a 2003 (?) CS kit called Evergreen. I like the addition of the green for Christmas, but a deep red or burgundy would look nice.


Below are the other four cards. You can see the way I used the Cuttlebug embossed metallic on the top card--just cut along the image with a craft knife to create a frame.
I hope you enjoyed a little early Christmas cheer using Lock & Key in an unexpected way. Next month's kit is Fire & Ice. Oh, dear!!

Thanks for making it to the end of my post. Your next stop on the hop is Marya over at A Notebook Novel. I'm looking forward to her Lock & Key creation!

Monday, October 14, 2013

Baby Wipe Technique

Reinkers + Baby wipes = Cool stamping technique! 

The creative ladies at Club Scrap Creates have a great tutorial on their blog. They are challenging us to try this technique, and I hope you will give it a try!

I don't need to recreate the steps for you, because you can find the complete tutorial here, so I'll just show you my creations.
 
First, I played with the large flower stamp from Hopes, since the tutorial mentions using solid stamps. The top two samples are made by getting ink directly from the inked baby wipe. For the bottom two, I used a separate wipe to pick up the ink from the inked baby wipe and apply it to the stamp. My deep colors are now pastels!

This stamp from Hopes works well, too.
 
So does the large feather stamp from Take Wing! Again, I applied ink directly from the inked baby wipe, then got a pastel effect using a second wipe to apply ink to the stamp.

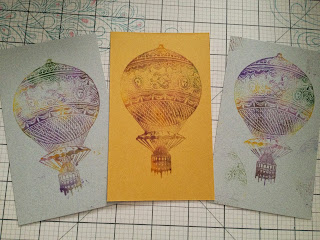
The tutorial also mentions using a second baby wipe to apply ink to card stock in various ways. I like the middle one especially; in fact, I tore that piece of paper to use on my final project (and challenge entry). 

 I wanted to see how a very detailed stamp would work with this technique, so I pulled out this large hot air balloon from the Up, Up & Away! kit (February 2013)
 
Despite not being a solid stamp, it has a compact, detailed design that works well with this technique.

 Here's my final card. Thanks for making it to the end of this blog entry. Hope you join me on October 30 for Club Scrap's blog hop featuring this month's kit: Lock & Key.

Saturday, October 5, 2013

OWH WCMD Blog Hop!

 
Isn't the modern world full of acronyms? You often have to be "in the know" to understand what they mean, right? Here's what my title means:
OWH=Operation Write Home
WCMD=World Card Making Day
 And you probably know what a "blog hop" is! 

I am so excited to be part of the 2013 OWH WCMD Blog Hop--I can't wait to see the amazing creations for this year! Our task was to use an OWH sketch to create a thank you card.  I chose Sketch #8. I like the two-tone background and circular focal image.
And here is my completed card. All the papers are from Club Scrap's Random Doorways collection (January 2013). For the stamps, I used CS's Tribal (August 2013) circular images unmounted stamps and the greeting wood-mounted stamp from Milestones (December 2008). The perfect circles were cut with Spellbinders Nestabilities dies--love those things!

Here's a close-up of the greeting--a bit blurry (I think my camera focused on the ric rac--also from Random Doorways). 
 
Thanks for taking a look at my blog. Enjoy the rest of the hop, and I hope you are inspired to make some cards for the troops!