Showing posts with label Take Wing. Show all posts

Monday, October 14, 2013

Baby Wipe Technique

Reinkers + Baby wipes = Cool stamping technique! 

The creative ladies at Club Scrap Creates have a great tutorial on their blog. They are challenging us to try this technique, and I hope you will give it a try!

I don't need to recreate the steps for you, because you can find the complete tutorial here, so I'll just show you my creations.
 
First, I played with the large flower stamp from Hopes, since the tutorial mentions using solid stamps. The top two samples are made by getting ink directly from the inked baby wipe. For the bottom two, I used a separate wipe to pick up the ink from the inked baby wipe and apply it to the stamp. My deep colors are now pastels!

This stamp from Hopes works well, too.
 
So does the large feather stamp from Take Wing! Again, I applied ink directly from the inked baby wipe, then got a pastel effect using a second wipe to apply ink to the stamp.

The tutorial also mentions using a second baby wipe to apply ink to card stock in various ways. I like the middle one especially; in fact, I tore that piece of paper to use on my final project (and challenge entry). 

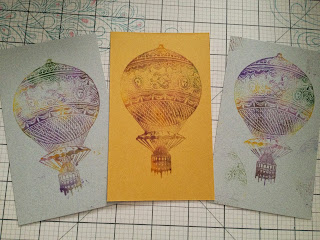
 I wanted to see how a very detailed stamp would work with this technique, so I pulled out this large hot air balloon from the Up, Up & Away! kit (February 2013)
 
Despite not being a solid stamp, it has a compact, detailed design that works well with this technique.

 Here's my final card. Thanks for making it to the end of this blog entry. Hope you join me on October 30 for Club Scrap's blog hop featuring this month's kit: Lock & Key.

Sunday, September 29, 2013

My Personal Challenge--September

I love to challenge myself. Whether it is to avoid sweets for a week, keep my desk decluttered, or create a certain number of page or cards, challenging myself gives me an opportunity for personal success. Don't you agree?


Now I have challenged myself to something new for the rest of the year. I'm going to create a Christmas card using each of the September thru December Club Scrap kits. This month's kit, Take Wing, has a bird, feather, swirl theme--not too Christmas-y, I know! But, the colors are navy, red, white, and two shades of green. Jackpot!


I used the twig UM stamp from the Collection sheet of rubber with Moss ink, then I added a touch of glue to each of the little balls on the ends of the branches and sprinkled with red glitter. Voila! They may look more like "Charlie Brown" Christmas trees, but I think they are festive! The "Joy" stamp and the "Joy Cheer" smaller stamp are from the Old World Christmas stamp set from way back in 2008. That one is no longer available through CS, but I have a few in my inventory that I can let go for $12 + shipping. If interested, leave a comment below with your email address, and we can chat. (I'll delete your comment so your email address isn't there any longer.)


Next month's kit is called Lock & Key. I hope I can meet the challenge and come up with a Christmas card design with that one! Stay tuned! And, if you are so inclined, leave a comment below on a way that YOU challenge yourself!

Saturday, September 28, 2013

Nesting with Take Wing collage stamp

Earlier this month I posted my first attempt at layering a stamped image using Nestabilities dies. You can see that post here. Last week I purchased the A2 matting dies and found that they are perfect for playing with this technique.


The card features the collage stamp from Club Scrap's Take Wing collection UMs.  Isn't this a great sheet of rubber? So many possibilities! The green paper is from Take Wing, while the beautiful blue and the red ribbon are from Peacock (October 2012).

Stay tuned for my next post where I show how I used one of these stamps on a Christmas card. Hmmm . . . which one will it be?

Wednesday, September 25, 2013

Take Wing Blog Hop!

 Welcome to my blog and thank you for following the September 2013 Club Scrap Blog Hop featuring the Take Wing collection! The starting point of the hop is Club Scrap Creates. There you will find the list of participating bloggers who are all creating with this cheerful kit!


My creation is a card featuring the collage image from the Borders & Backgrounds unmounted (UM) stamps. The technique came from the creative team at Technique Junkies and is found in their August/September 2013 newsletter. Their newsletters are full of fun and creative techniques, and they have CDs with tutorials, too! You can visit the TJ blog at http://techniquejunkies.blogspot.nl/.

This technique is called the Blocked Backgrounds Tutorial.

The supplies you need to create this card are:
5.5x8.5 White cardstock (folded in half for the card base)
5.25x4 Red Translucent 
5x3.75 White cardstock panel
Printed cardstock for the bird 
Black paper/cardstock (not shown)
White paper/cardstock for the sentiment
Green bird brad

Tools needed:
UM collage stamp and mounting block
Post-It notepad
Club Scrap India Black ink
Clear ruler (I love the Club Scrap 2x8 ruler for this technique!)
Black Sharpie marker (not shown)
Take Wing stencil
Paper piercer 
Scissors
Sentiment stamp

 
Step 1: Use Post-It notes to block off the top left quadrant of the White panel. Ink the collage stamp well with India Black ink, and stamp onto the quadrant. (You want to stamp off the edges of the panel, so be sure to have scratch paper underneath.)
 

Steps 2 & 3: Repeat the same technique in the upper right quadrant, being sure to leave a space between the stamped images. You want an intersection of white, like crossing streets along city blocks. Add a third stamped image in the bottom left quadrant, again leaving a space. (I added a piece of red foam under the panel to make the panel more noticeable in the pictures.)

Step 4: Again, repeat the stamping, this time in the lower right quadrant. Notice that I used the same two Post-It notes in each step. I'm a frugal crafter!
 Here is the stamped panel. I did not measure my spaces between the stamped images. I might try using pieces of low-tack tape (like Washi tape) to separate the quadrants next time. That would ensure even spacing, though my perfectionist tendencies have dissipated as I've gotten older. :-) 


Step 5: Using a Sharpie pen and clear ruler, draw lines around each block, like curbs around city blocks. My corners are not perfect (see the previous paragraph). I knew I was covering the intersection with a cut-out, so I wasn't too worried about it. The "Blocked Backgrounds" panel is complete. Not shown: Edge the panel using a black stamp pad.

To add a focal image to the card, I chose the bird from the Take Wing collection stencil. I moved the stencil around on the printed paper (below). Since I was using the Red Translucent paper behind the stamped panel, I chose the section with the red "branches."


Hmmm . . . I didn't want to trace the bird onto the front of the paper, because I wanted a nice, clean image. I discovered that if I used a paper piercer to place a tiny indent at the beak and the tail (not shown), I could flip the paper over, find the raised marks, and line up the reversed stencil the way I wanted it. I traced with a pencil and cut out the bird with scissors. (I left off the bird's feet, as cute as they are.)

The printed bird blended in too much with the background. Adhering it to black paper not only added contrast but also made her just a bit bigger. And adding dimensional tape raised her off the panel. Below: A simple white panel for the greeting doesn't detract from the artwork.


I'm so glad you visited my blog today, and I hope you give this fun background technique a try! Your next stop on the hop is Marya's blog.  Continue hopping along to see more creativity with Take Wing!

Tuesday, September 24, 2013

Take Wing Blog Hop Tomorrow!


For the first time, I'm participating in Club Scrap's monthly blog hop. I'm excited to show a new technique I've learned using Take Wing UM stamps, papers, and stencil. Hope you stop by!


Saturday, September 14, 2013

Playing with "Take Wing"

Club Scrap's kit this month is a fun, colorful one called Take Wing. Here's a picture of the CS kit; the Lite kit ships Monday!


Isn't it fun?! Just love the swirls, feathers, leaves, and birds. It even has some flowers, which endears it even more to me. The colors are a glossy white, two shades of green, a red, and the prettiest navy I've ever seen in a paper. In fact, that navy print in the top right of the picture has a silver print on it--probably my most favorite CS paper of all time!

I decided to play with the kit today. I've been making cards a lot lately. I like being able to try new techniques (new to me, anyway) on a smaller scale. 

These are the materials I picked out: both greens and a navy. All of these came from the HPOPs (half pound-of-paper) that CS offers. I like getting this pack so I don't have to cut into my 8.5x11 or 12x12 papers. It comes with various sizes of the kit papers. I also pulled out the navy ribbon from the kit and the "Thank You" stamp from the Greeting UM (unmounted) stamp set. The embossing folder in the back has a feather design. It's from Paper Wishes. I always label my embossing folders so I can find the one I want quickly.


I only wanted to emboss part of the panel--leaving the top smooth for the greeting. I placed the stamp on the paper and adjusted the paper inside the embossing folder. Ran it through my Wizard, and the beautiful feather design appeared.

After stamping the greeting, I adhered the navy ribbon at the top of the embossing. Sliding a smaller piece under that one, I tied a knot, which makes it look like a bow. Love that tip!
Here is the finished card. I die cut some flowers out of some small papers from the HPOPs bag. I really can't make a project without adding flowers of some sort. The dies are from Paper Wishes. The tiny flower in the center is from Club Scrap's Birds of a Feather collection from a few years ago. The green is a great match with the Take Wing kit.