Showing posts with label snowflakes. Show all posts

Wednesday, November 27, 2013

Fire & Ice Blog Hop!!

Welcome to Club Scrap's Fire & Ice Blog Hop! If you are following along, you may have come here from Janet's blog. If not, or if you need to start at the beginning, check out Club Scrap Creates.

The November 2013 kit from Club Scrap is an interesting mixture of warm and cool colors and hot and cold designs, hence the name: Fire & Ice. Don't these colors just scream "burning hot!" and "freezing cold!"? Lovin' it!
When thinking about this blog hop, I was trying to come up with a Christmas card like I did last month with Lock & Key. You can see that card here. I could have used the red and gold, but there is a really cool "ice" stamp on the Borders & Backgrounds stamp sheet. 
See it in the top right hand corner? Very unique! And although it's quite rare to have icy Christmas weather here in Georgia, this stamp did make me think of snowmen, and I love a "white Christmas" as much as the next girl.
Here are the supplies I used for my icy blue Christmas card (though I did change out the white StazOn ink for my much better Club Scrap white pigment ink pad). 
  • Black StazOn Ink
  • Faded Jeans Ranger Distress Ink
  • CS White Pigment Ink
  • Two shades of Blue and the White Glossy Cardstock from Fire & Ice
  • Icy Background Stamp (Fire & Ice)
  • Snowman Stamp from CS 2005 Christmas Collection
  • Post-It Note
  • Small Snowflake Stamp from CS 2010 Happy Holidays
  • Snowflake Brads
  • 3/4 inch Blue Ribbon from CS 2009 Birds of a Feather
  • Greeting Stamp from CS 2009 Joyful

First, I stamped the cute snowman on the Post-It note with black StazOn ink and trimmed out the lower part to create a mask (the sticky part is at the bottom of the snowman's body). Then I stamped the same cute little guy on the white cardstock. This StazOn cleaner is great for cleaning the stamp (I love clean stamps!).


I used the stamped Post-It note as a mask and covered the stamped image on the white cardstock. Then, I covered the lower part of the cardstock with the ice stamp inked with the distress ink. Peeled off the mask and voila! the snowman is standing on the ice!
To prepare the blue panel, I stamped it with small snowflakes using the CS white pigment ink (I stamped first onto scrap paper to make a lighter image). Adding three snowflake brads adds dimension to the background.
I "fussy cut" the snowman. No Copics in my studio since I'm not much of a color-er, so I pulled out my old Sakura micron pens to add a bit of color to my little guy. And to add more dimension, I added foam squares to the back of the white piece. On the front, I added a strip of ribbon and a fun sentiment to go with the fun snowman.

And here is my completed card. I love the effect that the masking does--the snowman looks like he's sitting on an icy hill, and he's as pleased as he can be!

If you've made it this far--thank you! I hope you like my fun Christmas card using papers and a stamp from the Fire & Ice collection. 

Your next stop on the hop is Marya's blog, so click here. Happy hopping!


Wednesday, October 30, 2013

It's Blog Hop Time!

Welcome, Hoppers! If you have just left Tiare's blog at iClassyGirl.com, then you are at the right place. If not, then hop on over to Club Scrap Creates to start at the beginning of this month's hop, so you don't miss any of the fun and creativity!

The featured kit this month is Lock & Key, and I challenged myself to come up with a Christmas card for this kit. The name doesn't really cry out "Christmas," does it? I knew I really had to put my thinking cap on! (To see the Christmas card I made with last month's Take Wing kit, go here.)


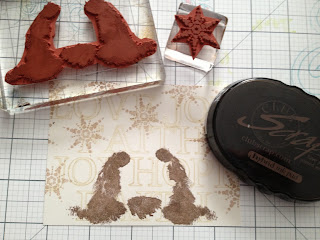
So, I was looking at the UM rubber, and the large words caught my eye. As a Christian, I believe that Jesus is the embodiment of these words: Hope, Faith, Love, and Joy. I realized that I had my connection between Lock & Key and Christmas!
 
I paired the words with the holy family and a snowflake from the Silent Night (December 2010) unmounted stamp sheet. Such unique artwork, don't you think?

Here's one of my final cards. Below you find the basic steps I used to create this unique card and four others.

However, if you are ready to hop on, your next stop is Marya's blog at A Notebook Novel.
I chose to work with five cards in the Lock & Key Greetings to Go pack. It's so handy to have cards that are precut and scored, with panels that fit so well! The pack even includes envelopes; I told you it was handy! Each month the Greetings to Go pack has 15 card/panel/envelope combinations (in three sizes) with cutaparts and fibers. One of my favorite Club Scrap products! (It's hard to tell, but those tan-colored panels are actually metallic--too cool!)
 
To start the cards, I stamped each of the ivory panels with the words using Club Scrap's Sandstone ink. An acrylic block with lines on it comes in real handy for keeping words straight.
On the words, I used CS Earth ink to stamp the holy family, then added snowflakes at half strength. Some folks call that "second generation" stamping. You just ink up the stamp, then stamp once onto scrap paper and then onto your project. You get half the amount of ink. I like the way Joseph, Mary, and the manger really stand out darker than the other elements. I stamped five similar ivory panels.  


When using metallic paper, I love to emboss it--there's something about the way the light hits the raised areas on metallics. Anyway, I used a Fiskars embossing plate for four of the panels and a Cuttlebug folder for the fifth. Since this Cuttlebug folder doesn't have an all-over design, I wasn't sure how I was going to use it, but I came up with a way. Below are the embossed panels. The fourth one is the Cuttlebug one.


And here, again, is my favorite of the five cards. I just layered the stamped and embossed panels on the card base and added some torn handmade paper and brads (the paper was from a 2003 (?) CS kit called Evergreen. I like the addition of the green for Christmas, but a deep red or burgundy would look nice.


Below are the other four cards. You can see the way I used the Cuttlebug embossed metallic on the top card--just cut along the image with a craft knife to create a frame.
I hope you enjoyed a little early Christmas cheer using Lock & Key in an unexpected way. Next month's kit is Fire & Ice. Oh, dear!!

Thanks for making it to the end of my post. Your next stop on the hop is Marya over at A Notebook Novel. I'm looking forward to her Lock & Key creation!